
This project came about, because I had an old porcelain bird bath that had broken into 11 pieces that I wanted to fix & spice up.

Since you'd most likely be doing your mosaic design on a new, inexpensive bird bath, you don't really have to worry about all the specific details of my gluing together of this one. Essentially, I just held certain connecting pieces together with rubber bands and set them with Gorilla Glue until all of the pieces could be glued to each other.
In order to do the mosaic portion of this project you will need:
- A Bird Bath
- Aquarium Stones
- Old DVDs
- Mod Podge Craft Glue
- Craft Glue
- A Sponge Brush
After cleaning it up & sanding it as best as I could by hand, I began painting my craft glue onto the basin of the bird bath & placing randomly colored aquarium stones.

I continued this process until the basin, sides, and edges of the bird bath were covered in aquarium stones.

Once my basin was set & dried, I flipped it over to begin the DVD mosaic portion of the project.
For this part of the project we'll be using the backs of old DVDs to create a prismatic mosaic on the outside of our bird bath.
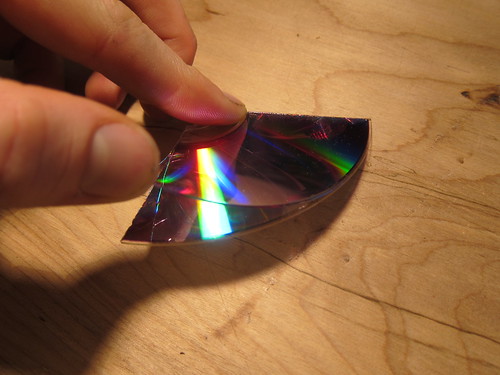
In order to use the reflective material of the back of a DVD, we will need to separate the layers of the disc. Before this project, I didn't even realize that DVDs had 2 layers to them! Anywho, in order to separate the layers, attempt to cut the DVD with a pair of scissors. This should put a nick in the disc that'll allow you to peel the layers apart.

(Image from Public Lab on their website {http://farm9.staticflickr.com/8480/8277324370_3743af6d7e.jpg}.)
Once you've peeled the layers of your disc apart, you can discard the label side of the disc, keeping the purple, reflect side. Next, begin cutting the reflective layer in random shapes and craft gluing them to the outside of the bird bath.
I continued this process until the entire outside of the bird bath was covered in the disc shapes.


After a final top coat of craft glue on the inside & outside of your bird bath, you are ready to go. Keep in mind, however, that the way we've made this bird bath has not prepared it to actually stay outside & survive the elements. In order to make your bird bath outdoor-ready you'll need grout & a sealant.
Once you've peeled the layers of your disc apart, you can discard the label side of the disc, keeping the purple, reflect side. Next, begin cutting the reflective layer in random shapes and craft gluing them to the outside of the bird bath.

I continued this process until the entire outside of the bird bath was covered in the disc shapes.
After a final top coat of craft glue on the inside & outside of your bird bath, you are ready to go. Keep in mind, however, that the way we've made this bird bath has not prepared it to actually stay outside & survive the elements. In order to make your bird bath outdoor-ready you'll need grout & a sealant.

Voila! You Have an Aquarium Stone/Recycled DVD Mosaic Bird Bath!
Thank You & Enjoy!


